PokeStops are places in "Pokemon GO" that lets you collect items such as eggs and PokeBalls use to capture more Pokemon. PokeStops are located at selected places near you that are indicated on your map with blue icons. When getting closer to the icon it will then change its shape and clicking it allows the player to swipe Photo Disc which will then show items in bubbles.
The PokeStop icon will change its color to purple once you are done collecting items and you will have to wait for it to go back to its original color to collect again which takes about five minutes. A PokeStop will give you three to four items at a time but if you are already level 5 and up you can get yourself PokeBalls, Pokemon Eggs and other items such as revives and potions that you can use in battles
Lure Modules and PokeStops
Purchasing a Lure Modules can give the player a privilege to can place a lure at any PokeStop to increase the amount of Pokemon in the area. A showering pink petals is seen on the map where the Lure Module is used and clicking on a nearby PokeStop will give you details on who used the lure.
How to Create a PokeStop Farming Spot
PokeStops can be a great place to find Pokemon when used with Lure Module. And some areas have already created actual farming spots that will have endless counts of Pokemon and supplies. Making your own farming spot is not easy and you will need a lot of things to make it work. Listed below are what you will need:
Multiple PokeStops
Location is the most important part of a farming spot. You will need to have many PokeStops near each other. Having 3 to 5 PokeStops that are just walking distance is a good thing to start with. Check your location and explore for you to find a good place.
You need to remember that PokeStops have two important uses. First is they can give you a constant stream of Pokemon when lures are active on them and the second use is to fill up your poke ball supply
Bring Lures
You will need a lot of Lure Modules in order to make this work. You will either need to buy some or get a group of friends to help you with it. Having all of the PokeStops with active lures is the most important thing to farming.
You can also use incense when walking for bigger boost. You will now have Pokemons showing up and being lured at the same time.
The “Pokemon GO” craze continues and gamers are frantically on the prowl for those Pokemons in an effort to fill up their accounts with common and rare creatures.
But for the ones who have been playing “Pokemon GO," the game is not all about catching these characters. Some may have collected those eggs that come in tow or from “Poke Stops”. The question now is what are those eggs for?
What are those eggs?
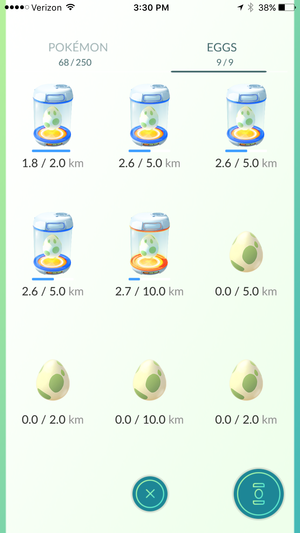
For the neophytes, those eggs come in different classes. There are the 2 km, 5 km and 10 km eggs. Each egg hatches once a user fulfills the desired range. This also means that staying in one place and waiting will not help.
2 km eggs normally hatch the usual Ratatas or Pidgeys, a no brainer for the ones who have started playing “Pokemon GO." The 5 km eggs offer a better chance of adding uncommon Pokemons (i.e. Eeves and Pikachus) while the 10 km eggs offer the rare ones like Hitmonchan or Dratini.
In short, the more you walk or get around, the better chances of snagging those Pokemons. For players not actively on the go, this could be a problem unless some new cheat (or app) is available.
Watch your walk
Lifehacker explains that a great way of hatching eggs and leveling up could be in the way a “Pokemon GO” gamer walks. Gamers are advised to walk via straight line for more accuracy in measuring the travel distance.vHence, walking frantically in circles will not get you anywhere so doing this may help out.
Battery saver and GPS inaccuracy
The BitBag offers an interesting take using the battery saver and GPS of devices. They advise to hatch the “Pokemon GO” eggs first without walking and then enable the battery saving feature.
This makes the GPS less accurate and ‘trick’ the “Pokemon GO” app into believing that the gamer is walking when in fact he is not. This seems like an unstable way of getting the most out of those “Pokemon GO” eggs but could be worth a shot.
This guide will help players line their wallets with more PokéCoins in Pokémon Go. PokéCoins can be earned by performing certain tasks, or purchased with actual money through microtransactions.
The Pokémon Go grind is well underway in most regions around the world. If you’re one of the many trainers going out on daily excursions for new ‘mons, you’re likely going to need a steady supply of Pokécoins to restock your inventory with important items, such as Pokéballs, Incense, Lucky Eggs, and many other items.
Pokécoins are the in-game currency in Pokémon Go. Pokécoins can be accumulated by completing certain activities or by purchasing them with real-world money. This guide will explain several ways to get more Pokécoins without having to spend any actual cash.
Defend a Gym
Once your Trainer Level reaches level 5, you will be asked to choose a Gym Team of a particular color. After joining a team, you then have the ability to join either an unclaimed Gym, or a Gym of the same team color. Place one of your Pokémon in an available Gym to defend it for your team. In the upper right corner of the Shop page, you'll find a Shield icon. The number on the Shield indicates how many Pokémon are defending a Gym. 1
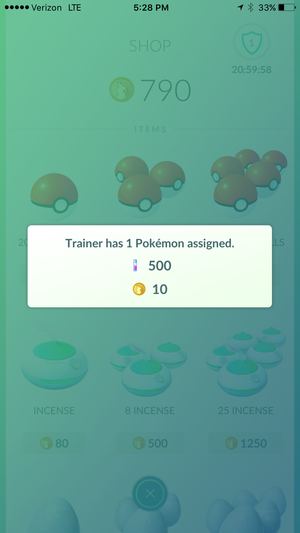
As long as you have a Pokémon stationed at a Gym, you’ll receive a Defender Bonus that rewards you with 10 free Pokécoins and some Stardust every 20 hours or so. Click on the Shield in the Shop to retrieve your daily defender bonus. You can control up to 10 Gyms at a time, meaning you can earn up to an additional 100 Pokécoins each day.
Battle to Control a Gym
If a Gym is already occupied by an opposing team, you will need to battle and defeat each of its members in order to claim the Gym and take it over. Each claimed Gym has a certain prestige level, based on the number of trainers in the Gym. This indicates how many trainers you need to beat before taking over that Gym.
Upon taking over a Gym, place one of your stronger Pokémon in the gym to defend it for as long as possible. You’ll accumulate Defender Bonus Pokécoins for having your Pokémon stationed at the Gym. Coordinate with your friends and have them join the Gym to increase the Gym’s prestige and improve your chances of defending it.
Visit PokéStops to Get Items
If you need items and don’t want to wait around to earn the necessary Pokécoins, you can swing by a few PokéStops and collect some free items instead. PokéStops are basically miniature social hubs where you can collect various in-game items and use Lures to attract Pokémon (and usually other nearby trainers).
PokéStops appear as blue squares on the map. Once you’re at the stop, spin the icon at the stop to gather items for your inventory. The PokéStop will refresh after five minutes, allowing you to repeat the process again and obtain more items. After visiting several PokéStops, you may end up acquiring the items you intended to purchase with Pokécoins anyway.
If you want to increase your chances of finding rare Pokémon, you must first increase your Trainer Level.
Pokémon Go can be an expensive habit. Sure, it’s free to download, and you can play as much as you want without spending a thing—in fact, we have some suggestions on how to make the most of a no-pay approach.
But like most free-to-play games, Pokémon Go has some hugely appealing perks that aren’t easy to come by or very plentiful unless you buy packs of coins, and the temptation to spend can be pretty serious when you’re making slow progress day in and day out. And while you can earn in-game coins, that too is a slow and uncertain process.
Thinking about pumping some cash into Pokémon Go? Before you do, here’s a look at how you can earn coins through gameplay, what kinds of coin packs are available for purchase, and which items are most beneficial if you do end up reaching for your wallet.
Earning coins
You’ll have to wait for the timer to tick down before redeeming further defender rewards.
As of now, there’s only one way to earn coins in Pokémon Go: by occupying and defending gyms. You’ll find gyms all around the world map—they’re the tall structures with a Pokémon up top, and by this point, each should be dominated by one of the three teams. Once you reach Level 5 in the game, you can pick a team and enter the fray.
If you find a local gym with your team housed within, see if you can add a Pokémon to help defend it. You’ll find the option on the lower left side of the screen if the gym has an open slot to fill, and you can pick your most powerful Pokémon (with the highest CP rating) to help battle back any rivals who try to take the gym.
On the other hand, if you find a gym under the command of an enemy team, you can try to take it back for your crew. You’ll need to defeat all of the Pokémon guarding it—or work together with allies to wear them down—to turn the gym neutral, at which point you can add one of your own Pokémon.
Earning 10 or 20 coins at a time won’t add up very quickly, unfortunately.
Whatever the case, if you have a Pokémon installed in at least one gym, you can reap the rewards. Hit the Shop and look for the little shield icon on the upper right. Tap that and you’ll collect a Defender bonus of 10 coins and 500 Stardust for each gym you currently control, up to a maximum of 10 gyms. Then the timer will reset, and you’ll have to wait 21 hours to redeem any further rewards.
I’ve held a few gyms in my time, but here in Chicago, most of the gyms around me tend to change hands multiple times an hour—so I’ve never been confident enough to try and find further gyms to hold down before collecting my bonus. Over time, as casual players thin out and hardcore fans wield ultra-powerful Pokémon, perhaps the gyms will stay with one team for longer spans. But really, after playing the game steadily for nearly three weeks now, I think I’ve collected 50 coins via this process. You can’t buy anything with 50 coins.
Buying coins
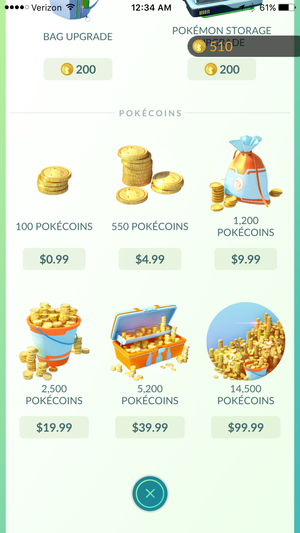
Pokémon Go’s coins are sold in bundles, and unsurprisingly, you’ll get a better deal the more you’re willing to spend at one time. You can snag 100 coins for $1, 550 coins for $5, 1,200 coins for $10, 2,500 coins for $20, 5,200 coins for $40, or a staggering 14,500 coins for $100.
Coins are serious business in Pokémon Go. Spend (and buy!) them wisely.
On the low end, you’re essentially swapping one penny per coin, while the largest bundle trims the price of each coin down to $0.0068. So you’ll save a fair bit of money over time by buying in bulk, rather than making tiny deposits over time, but dropping $40 or $100 in a mobile game is a big ask.
Personally, I’ve spent $13 in the game so far and still have about half of those coins unspent. Initially, I resisted spending larger chunks of money and only dropped $1 here and there to buy a Lure, which let me draw Pokémon near a PokéStop—perfect for when I’m hanging out at a playground with my son. Eventually, however, I bought the $10 pack and have been picking away at the balance here and there.
Spending coins
Why buy coins in Pokémon Go? Well, ideally it’s not to replenish core items that you can get by visiting PokéStops—you’ll get a lot more value by occasionally buying items that boost the amount of experience you earn from playing, or that maximize the time you put into the game. Here’s a look at what’s available in the Shop and whether or not it’s worth your hard-earned coins.
If you hit a lot of PokéStops, then you shouldn’t need to buy Poké Balls. In fact, you might need to ditch some!
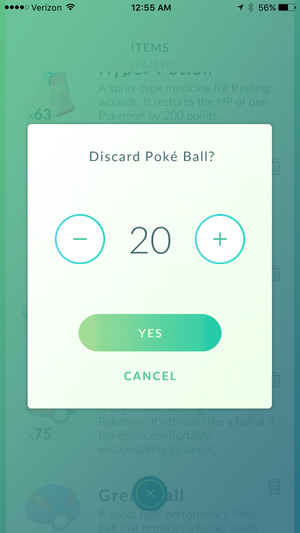
Poké Balls: As mentioned, I live in a busy urban area—so I come from a place of privilege when it comes to PokéStops. They’re everywhere around me, and I can easily hit 10 or so in a 10-minute loop when I want to stock up on items. Given that, I’ve never come close to running out of Poké Balls, as they’re typically granted for visiting PokéStops. In fact, I routinely toss out dozens at a time when I hit my item storage limit.
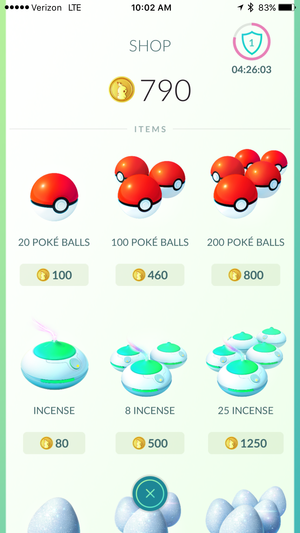
If you don’t have nearly as many PokéStops nearby, or you’re a spotty aim during capture attempts, you might be tempted to buy packs of Poké Balls, which are available in quantities of 20 (100 coins), 100 (460 coins), and 200 (800 coins). I don’t recommend it, however: Try to find somewhere nearby with a cluster of PokéStops and walk a loop to boost your inventory.
Incense: Incense causes Pokémon to pop up around you, no matter where you are, so they’re handy if you’re stuck in the office or don’t feel like leaving the couch. However, when standing still, Pokémon only appear every five minutes, and more often than not they’re super-common monsters. As such, they’re not the most exciting power-ups.
You’ll get them as freebies every so often, and you should definitely use ‘em if you’ve got ‘em. However, paying 80 coins for one, 500 coins for eight, or 1,250 coins for 25 of them doesn’t feel like a particularly great use of money—especially when Lures seem to offer more bang for your buck.
Lures are a wonderful thing, especially when your neighbors are generous with them.
Lucky Eggs: If you’re a power player, then Lucky Eggs could wind up being your best friend. Each Lucky Egg doubles your earned XP for a span of 30 minutes, and while that’s helpful for capturing Pokémon in the wild and activating PokéStops, it’s even better for mass-evolving the Pokémon in your stable.
Got a stockpile of Pidgeys, Weedles, or any other common monsters? Evolve as many as you can using the specific candy for each Pokémon, and then send the duplicates away to earn even more candy. You’ll earn a bunch of XP at once, and if you have a Lucky Egg active, you’ll double that massive tally. It’s awesome. They’re priced the same as Incense: one for 80 coins, eight for 500 coins, and 25 for 1,250 coins.
Lures: Lures are wonderful because all players benefit from a PokéStop with a Lure on it, so you can mooch off nearby players. But if you’re at a restaurant, park, or anywhere else with a PokéStop and want to play while you’re stationary, a Lure can help you draw a steady flow of monsters to your location. Better yet, areas with overlapping PokéStops can be absolute goldmines for captures when they all have active Lures.
You’ll get Lures at certain points for leveling up, but otherwise, they’re one of the most valuable items worth buying if you’re in the right situation. It’s 100 coins for one or 680 coins for eight—no mega-packs here.
Buying a couple extra incubators helped clear a bunch of 2km eggs, letting me finally snag some vaunted 10km ones instead.
Egg Incubator: If you’ve got eggs resting in incubators, they’ll cook slowly as you accumulate distance by walking with the game open, and then finally hatch and grant you a free Pokémon. Unfortunately, I ran into a problem: I’d played for hours and hours and was at level 16, yet had never received a special 10km egg. My problem? My egg inventory was at capacity and I hadn’t been incubating the common 2km eggs regularly to make room.
Realizing my conundrum, I bought a couple of extra incubators and had five eggs incubating at once for a few days, which let me blast through my reserves and make some space. And lo and behold, I got my first 10km egg. At 150 coins apiece, the incubators are not cheap—but that was a major frustration that wasn’t going to resolve itself quickly, so I’m happy with the decision. You’ll find incubators every so often, but buying an extra (or two) can be handy.
Upgrades: Lastly, Pokémon Go offers a pair of upgrades for 200 coins apiece: The Bag Upgrade lets you store 50 more items (up from a base of 350 items), while the Pokémon Storage Upgrade adds 50 more slots for keeping the monsters (up from 250 to start).
Honestly, there’s little reason why you would need either of these. If you hit the item limit, chances are you have way more potions and Poké Balls than you’ll ever need; I end up pruning my inventory every few days when I hit the cap and dump Revives, weaker Potions, and basic Poké Balls as needed.
As for the Storage Upgrade, you don’t have to hold onto every last Pokémon once you capture it. You should be transferring duplicates to Professor Willow, which helps you gain candy for evolutions, and every captured Pokémon is represented in your Pokédex anyway. If you’re coming close to the storage limit, then it’s time to set a bunch of them loose.